

Debugging is an important phase when it comes to software development or just even personal coding. It is a skill that every developer and engineer needs to have. You need to be able to make sure that your code works and in the way that you intended for it to work, otherwise you would have spent a lot of time sitting by your laptop coding throughout for nothing.
However, debugging is not easy if you do not have the proper tools and skills needed to find that troublesome bug that isn’t making your code work after all those hours of sleepless nights spent coding.
JavaScript offers you the famous console.log() which every JavaScript beginner, novice and expert has to know. Console.log() is known for helping you check whether your code is doing what you want it to, however, it is quite limiting in its scope as it does not allow you do know and do a lot of other things such as working with a lot of data, tracing how function calls are happening, see the time it takes to execute your code in order to refactor it and many more other scenarios.
But thankfully, JavaScript also offers you a list of different methods of consoles that you can use to better debug your code and also understand what you are doing. Below is a list of some of the different types of consoles that you can use when coding and debugging:
console.log()
console.dir()
console.group()
console.trace()
console.time()
console.warn()
console.error()
console.debug()
console.clear()
console.assert()
console.count()
console.table()
1. CONSOLE.LOG()
Use console.log when you want to see whether a small section of your code outputs the desired information. This is a very powerful technique as it makes coding and debugging easier and fast than going through line after line checking to see where the possible error might have occurred.
function findSum() {
let num1 = 10;
let num2 = 4;
return num1 + num2;
}
console.log(findSum);
By logging out the function, you ae able to check whether the function will indeed find the sum of the two numbers or whether it will return a strange value.
2. CONSOLE.DIR()
Console.dir is one of my favourites because it lets you see more than just some of the attributes of a tag but all of them. You get to see all the attributes and properties that are applied and not applied on a particular tag as well as seeing whether it is from a div, has a class property or an id property. Simply use the console.dir() and pass an argument to it of the tag that you want to see.
console.dir(header);
Will return all the attributes that have been applied and not applied to the header tag. This makes it easy to identify which attributes you would like to add or remove from the tag.
3. CONSOLE.GROUP()
Groups are great to work with especially when you have similar information that related to each other in one or another. You can group them by using the console.group(), and choose to name the group by giving the group an argument or not depending on how many groups you are working with. Items that will fall under a group will be indented below the group name to show that they below to a group.
By default, all items of a group are extended and you can collapse them by using the console.groupCollapse(). This makes them hidden until you click the extend button to view the items.
Another thing you can do with groups is to end the group so that items that do not belong to a group are not accidently placed inside the group. You do this by using the console.groupEnd().
console.log(“I will be working with groups now”);
console.group(“Group-1”);
console.log(“Hey, I am part of the group 1”);
console.log(“Hey, I am also a part of the group 1”);
console.groupEnd(“Group-1”);
console.log(“The end of group 1”);
console.groupCollapsed(“Group-2”);
console.log(“Hey, I am part of the group 2”);
console.log(“Hey, I am also a part of the group 2”);
The first console.log will output the string at the immediate start of the console the same way that console.group will display the name of the group at the immediate start of the console. However, the items inside the group will be indented right below the group name to show clear indication that they are part of a group and should not be mistaken to be regular console.log items. After that, we end the group by calling the console.groupEnd on the group 1 and logging out other message telling us that we are no longer in the group.
After this, we create another group called group 2 but this, we choose to collapse it’s items so that they are not viewed immediately.
Working with groups helps in making sure that only related items will have certain characteristics and not all of the items.
Use them only when you have information that is related to each to other.
4. CONSOLE.TRACE()
Traces the hierarchy (order) of function calls that are being made. It is very useful when you want to keep track of how functions are being called in your code program and if you need to make any changes, it becomes easy to change the order of the function calls to suit what your program is supposed to do.
function one() {
addNumbers();
}
function two() {
one();
}
function addNumbers() {
console.trace();
}
two();
5. CONSOLE.TIME()
Something to note about working with the console.time is that it starts the timer of execution but returns nothing to the console. In order to actually see anything being displayed on the console, you have to use either the console.timeLog() or the console.timeEnd().
The console.timeLog() will always be the first to log before the console.timeEnd() is logged onto the console. This is because console.timeLog lets you set the time for how long you want for the execution to take place and then the console.timeEnd shows you how long it took for the execution to complete. You can set your own values in both instances and wait to see what will be displayed on the console.
console.time(); // displays nothing
setTime( () => {
console.timeEnd();
}, 1000); // logged after the timeLog

setTime( () => {
console.timeLog();
}, 500); // logged first
6. CONSOLE.WARN()
Found in your browser along with the console.info, console.debug and console.error. The console.warn simply shows you the warnings right in your browser informing you of certain constraints that may are making your code run slowly or any other type of warning. This does don’t mean that your code will not run but are just warns that you can either wish to ignore to attend to.
It is by default already selected for you when your navigate to the console panel in your browser and then click on the default or all levels.
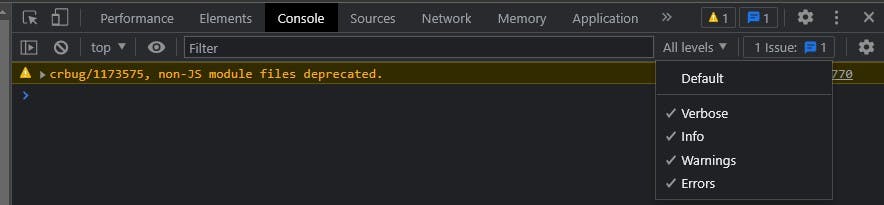
7. CONSOLE.ERROR()
Similar to the console.info, console.debug and console.warn, the console.error shows you the errors in your code that are making it not run. It makes a part of the four default debuggers that the browser offers in the developer tools. It is important to take note of the errors that the browser shows you and try to research how you can fix them in order to make your code run.
It is by default already selected for you when your navigate to the console panel in your browser and then click on the default or all levels.

8. CONSOLE.INFO()
The console.info() works almost the same way that the console.log does, it simply logs out an informational message to the web console. It is found in the browser by right clicking on your open window and navigating to inspect which is a developer tool where you can find a lot of very helpful resources. Once the inspect opens, navigate to the Console and below that, you will see a blank black console with a taskbar at the top. Click on the default values or all levels and you should see a list of different types of debuggers that are embedded into the browser.
By default, the info is already selected for you but you can choose to unselecting it if you do not want to see the informational part.

9. CONSOLE.DEBUG()
Console.debug is another one of the browser’s default debuggers. It is found with the console.info in the console panel. However, by default it is not selected and if you want to enable it, click on the verbose and that should active it.
It is useful when you want to see the debugging details right in your browser.
10. CONSOLE.CLEAR()
Console.clear simply clears out the terminal and allows you start on a new one. This is essentially helpful when you do want to confuse yourself by having different outputs on the terminal that are not related.
function findSum() {
let num1 = 10;
let num2 = 4;
return num1 + num2;
}
console.log(findSum);
console.clear();
console.log(“This is not part of the function”);
The output from when the function findSum was logged out will be cleared from the terminal and will be replaced with an empty one before the string This is not part of the function is logged out. In so doing, you can clearly see that the two console logs were not related and makes it easier to understand your output.
11. CONSOLE.ASSERT()
Works the same way that validation works but it works on the condition that you as the programmer has set. Console.assert takes two parameters; one is a Boolean value while the next is what you want to be displayed according to your set Boolean value.
let isTrue = false;
console.assert(isTrue, “It doesn’t work”);
The console will display a message letting you know that the assertion has failed and then the string it doesn’t work. However, if you change the value of isTrue to true, nothing will be displayed on the console.
Very handy when you want to make assertions and check if your code works.
12. CONSOLE.COUNT()
This simply counts the values and is essentially helpful when you are working with numbers and loops. You can either use the console.count with an argument or without an argument passed to it. Pass an argument to it when you are using many console.count in your program so that it is easy to keep track of what you are counting at that particular moment.
Another thing about the console.count is that you can use the console.countReset() which is used to reset the count variable and keep you on track while not continuing to count from the previous counter.
for (let i = 0; i < 5; i ++) {
console.count(“first-count);
}
console.countReset(“first-count);
for (let i = 0; i < 10; i ++) {
console.count();
}
13. CONSOLE.TABLE()
Comes in handy when you want to easily see data, especially when working with API. It lists all your information in form of a table which makes it easy to identify what is what and what is stored in particular variables. You pass an argument to it when you want to only view certain information and not everything.
console.table(data.document);
The above will return the information in form of a table thereby making viewing easy for you the programmer.
SUMMARY
Something to know is that you can also use the debugger right inside Visual Studio Code, it is more effective when you do not have a browser to work with but would like to make sure that your code works the way you intend it to work.
Ever since I started using the different types of consoles and the debugger inside VS Code and the developer tools in the browser, I’ve found it easy to debug my work and actually get a good understanding of what is happening behind the scenes as well as on the surface. Use both the browser’s developer tools and VS Code’s debugger tools to easily debug your code while also learning about errors, different types of warns and other resources that both have to offer.
Connect with me on: